Below, I am outlining what has worked for projects I have worked on and am currently working on. Keep in mind that this simple project folder approach allows you to break items down, making even large projects more manageable. If you're working on smaller projects you may not think this isn't necessary, but from experience I can say that the more things get broken down, the less things will break down. This will also allow more users to work concurrently on the project, and more importantly lessen the chances of your entire project being corrupted.
Civil 3D Project Setup
Set working folder in Civil 3D to current project.
Image 1
Right-click
to access “New Data Shortcuts Project Folder”.
Image 2
After
you select New Data Shortcut Folder the Dialogue window will open as shown
below. For name type in Civil 3D and be
sure to check “Use project template”.
Image 3
Note
the Project template folder path may be different . Choose “_Civil3DFolderStructure”
(circled in red). Type “c3d’ under the
name (blue).
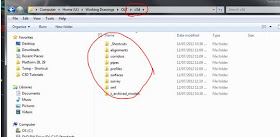
The
project should create a folder structure as shown below. (There folders were previously defined to be
included in “_Civil3DFolderStructure”.
You can adjust folders you deem necessary, but each folder listed below
is used to house each type of Civil 3D object that may be encountered.
Image 4
In these folders this should be were you create you
Civil 3D models (eg. Alignments, corridors, profiles, etc in their respective
folders). There is a folder named “z_archived_models”,
which is to be used for archiving older model files. Inside that folder is another folder “yyyy.mm.dd”. Change the name of the date and copy all the
contents, exception “z_archived_models” into the dated folder.
For proper archiving you will have to “Promote” C3D
objects in the archived drawings.
When
creating a new drawing……..
Use
the GO_TEMPLATE.dwt file. In this case I have a template I have adjusted Civil 3D object styles. You can use NCS standards that come out of the box, if you don't have any adjusted styles yet.
J:\Division\PPM\PM Library\Transit\GO SETUP
(Your location will be different. Somewhere on the network is advised so all team members have the same access)
This
file has been altered to include specific alignment, profile and cross-section
styles. It also has pipe structures
included and tabs that have the GO border in it. The GO border is created using fields. The fields will allow changes to be made to
the border via the Sheet Set Manager.
See Creating Cross-Section Sheets on a previous post for more information.
Delete the tabs that are not being used in those drawings. For example (see below), if you are creating
a 1:500 Plan and Profile Sheet, only leave the circled tab.
Image 6
The
other tabs are set for:
a.
1:500 Plan
b.
1:1000 Plan
c.
1:200 Cross-Sections
Best Practices are to create Profiles in their own drawing,
Alignments in their own drawing and cross-sections in their own drawing. The sample lines will have to be included in
the cross-section drawings. Prior to creating
sample lines, you should attach (NOT OVERLAY)*[i]
your corridor into a blank drawing (created from the template) that you will
house the sample lines and the x-sections in. Once you shortcut the alignment and profile in you can add sample lines over the corridor.
I apologize if this post isn't as direct as others, but one must understand there are several liberties that each individual user can take here. I had to consider one client and make modification based on their desires.
[i] If
you overlay rather than attach, you’ll most likely encounter quantity
definitions being defined.


No comments:
Post a Comment